
They came together in almost the same way as the knee joints, including the slightly annoying void space in the joint, though this time there was not too much of it. This is due to the elbows being designed to fit together with the arm bending at 90 degrees with very limited varience from that pose.
Of course, I'm not doing anything that simple. While the left arm will be bent, the right will be almost pointing straight downwards. There were two major areas that would cause problems:
1) The kit isn't designed to be posed this way - some work woul dbe required to make it work (no problem).
2) Due to the limited surface areas pinning will be a problem. Unlike the knee joints the gun wil be hanging free, so any pin will have to anchor the gun to the elbow in such a way to prevent it falling off. This will be a very high stress joint (also prone to being knocked), so this was more of a problem.

Unlike the knees, which were the size of a standard infantry figure, the elbows were much slighter, and they were fitting into smaller sections. As you can see above I opted to go into the gun first and then the elbow. To compensate for the change in posture I came up with a simple, yet timeless solution: big wad of greenstuff.
The left gun arm, being mounted in the manufacturer's recommended position, was an easier affair. All I had to do was fit a pin horizontally into the elbow.
Both upper arms were pinned diagonally down into the elbow, drilling down from the seam line on the upper arm. Where I drilled is visible on the picture marking the pinning positions below. I considered putting a small pin through the elbow, like a hinge, but decided against it as I was worried it would be putting too many holes in the material to make it worth while.
Next came trying to get the arms attached to the shoulders. The plan was simple:
- Glue outer and inner shoulders together.
- Place in position on torso.
- Drill hole into torso through shoulder socket.
- Tack upper arm in place with spot of superglue.
- Drill through reverse of shoulder into upper arm.
- Pin in place.
- Congratulate self on job well done.
Yeah... not so much.

I ended up taking two more attempts... and used the first hole anyways.
The problem with my plan is that, unfortunately, the design of the shoulders is really, really, really bad.
This isn't something I say lightly - I first noticed it when I was looking over the instructions and test fitting the pieces after cleaning, and was unfortunately correct on. The problem is the way the layered shoulder guards fit together in relationship to the way the arm and torso attach.
The outer shoulder fits around an extended ring on the torso, with a fairly small contact area. The inner shoulder clips into the outer, joining solidly at the base, but by a 3mm tab at the top. The upper arm has a ball that cups in the inner shoulder.
So the entire arm assembly is effectively being held by a 3mm wide, 2mm tall tab of resin. This is not good:

It also creates a problem as there is a large void space between the shoulders and torso, so trying to get a pin to line up between them is a right royal pain - not to mention everything is at odd angles, curved or underhanging the shoulder guards.
It would have been much better to have the torso rings extend out further for the upper arm to connect to directly, and have the inner shoulder join in the same way but be hollow.
In any case, the right arm had four attempts at drilling a hole that lined up correctly and allowed the outer shoulder to join on straight, while the left has a pin bent in a slight zig-zag...
There quite possibly was some way of doing things by packing out the cavity with greenstuff but where the other places I've done that have been due to my choice of pose of wanting to be sure of stability, this just seems like a big design oversight.

Pin positions.
Still, before the arms go on, some other parts need to be attached to make sure they're not going to clash - and before they go on they are undercoated.
The gun barrels are also fixed on at this point. I didn't pin them as I would rather they break off if hit than they take the whole shoulder out (I'm a bit paranoid about them). The gun's hoses and fins are glued in place.
The large shoulder guard mounting rings need to be put on now, as they can't be attached after the shoulders go on. The missiles, small wings and various decorative plates are also stuck on here.

Once they are all in place I fixed the arms on, with much cursing, but they seem stable enough now.
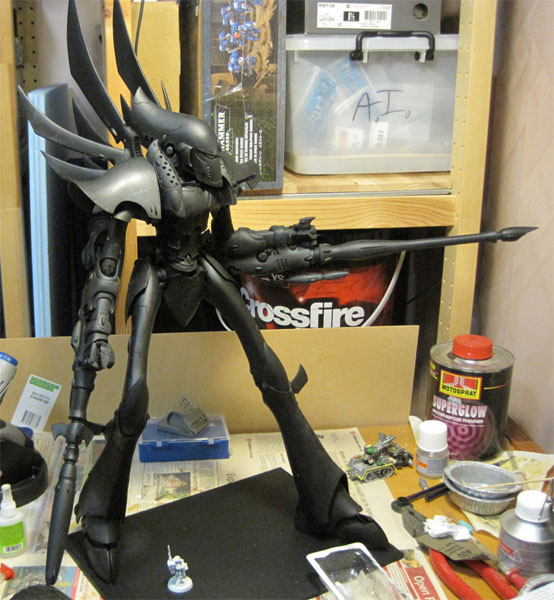
You may notice in the pic above the shoulder scatter laser is pointing a fair degree upwards. This is due to my failure to check the angle the missiles mounted on the torso when I fitted the magnet. It wouldn't be too hard to correct had I discovered it before I glued the missiles to the torso, but too late now.
Luckily it's under the AA missile pod, so it works ok.

Next up: The helm and converting the steersman
No comments:
Post a Comment